Openvpn-setup
This page describes how to set up an OpenVPN server installation on Debian Linux. For a very basic host-to-host vpn, check out this OpenVPN page.
The recipe here creates an OpenVPN setup with:
- certificates
- username and password authentication
- multiple clients
- client vpn dhcp
On the Server (Debian Linux)
Install the software
- Make sure to have 'contrib' listed in /etc/apt/sources.list
# apt-get update
# apt-get install openvpn
Set up a Certification Authority
See the easy-rsa page for installation details.
Create vpn client user accounts
- On the vpn server add a new user group called 'vpn-users'
groupadd vpn-users
- Create a new vpn account without a shell and make it part of the vpn-users group. We need to do this for every vpn client.
- set the password for the vpn client user account.
# useradd -s /bin/false -g vpn-users client1
# passwd client1
Create OpenVPN pam.d authentication plugin
- create a file /etc/security/vpn.group.allowed
# echo "vpn-users" > /etc/security/vpn.group.allowed
- copy the default authentication script to create the /etc/pam.d/ovpn plugin
# cp /etc/pam.d/login /etc/pam.d/ovpn
- edit the ovpn pam file, position the cursor at the first line and insert an auth directive
auth required pam_listfile.so onerr=fail item=group sense=allow file=/etc/security/vpn.group.allowed
Create vpn server configuration file
- create the server configuration file /etc/openvpn/server.conf
port 655
proto udp
dev tun0

ca      /etc/openvpn/easy-rsa/keys/ca.crt      # generated keys
cert    /etc/openvpn/easy-rsa/keys/server.crt
key     /etc/openvpn/easy-rsa/keys/server.key  # keep secret
dh      /etc/openvpn/easy-rsa/keys/dh1024.pem

#plugin /usr/lib/openvpn/openvpn-auth-pam.so ovpn         # old location
plugin /usr/lib/openvpn/openvpn-plugin-auth-pam.so ovpn  # new location

script-security 3

server 10.9.8.0 255.255.255.0  # internal tun0 connection IP
ifconfig-pool-persist ipp.txt

keepalive 10 120

comp-lzo         # Compression - must be turned on at both ends
persist-key
persist-tun

status /var/log/openvpn-status.log

verb 3  # verbose mode
client-to-client
Additional instructions to use your vpn as the client's default internet gateway. vpn-gateway
Distribute certificates to client(s)
- Copy the ca.crt, clientname.crt, clientname.key from the server to the client(s).
For a Linux client, copy the files to /etc/openvpn/.
For a Windows client, copy the files to C:\Program Files\OpenVPN\config\.
On the Client (Debian Linux)
(see further down for setting up the client connection on Windows)
Install the software
- Make sure to have 'contrib' listed in /etc/apt/sources.list
# apt-get update
# apt-get install openvpn
Create client configuration file
- create the client configuration file at /etc/openvpn/client.conf
client
remote remote.vpn.server.address
dev tun0
port 655
proto udp

auth-user-pass

nobind

ca     /etc/openvpn/ca.crt
cert   /etc/openvpn/clientname.crt
key    /etc/openvpn/clientname.key

comp-lzo         # Compression - must be turned on at both ends

# add a route to the client see other hosts on the server network
# you may need to update this line to match your network setup
push "route 192.168.0.0 255.255.255.0"

persist-key
persist-tun
verb 3
On the Client (Windows)
Probably the most used add-on to OpenVPN is the Windows client GUI. The old client GUI is effectively unmaintained, but is still (as of 19 February 2013) included in the official OpenVPN-2.3 installer packages. The new GUI is more advanced and uses the OpenVPN management interface for controlling the OpenVPN daemon and should therefore be more reliable. The new GUI will eventually replace the old GUI in the official installers.
Install the software
- Download the openvpn windows installer from http://openvpn.net/index.php/open-source/downloads.html
- Run the installation binary and install the software, just accept all defaults.
Create the client configuration file
- open a text editor, create c:\program files\openvpn\config\client.ovpn and add the following lines:
client
remote remote.server.ip.address
dev tun
port 655
proto udp

auth-user-pass

nobind

ca     ca.crt
cert   clientname.crt
key    clientname.key

comp-lzo         # Compression - must be turned on at both ends

# add a route to the client see other hosts on the server network
# you may need to update this line to match your network setup
push "route 192.168.0.0 255.255.255.0"

keepalive 10 60
ping-timer-rem
verb 3
Start the VPN tunnel
On the server (Debian Linux)
- with the .conf file placed in /etc/openvpn/ the vpn server will be listening for incoming connections automatically when the system is booted.
- use the init script to force a restart of the vpn server
/etc/init.d/openvpn restart
- check the log files in /var/log/ for debugging
On the client (Debian Linux)
- with the .conf file placed in /etc/openvpn/ the vpn client will automatically try to make a connection to the vpn server when the system is booted.
- use the init script to force a restart of the vpn client
/etc/init.d/openvpn restart
- a prompt asking you for a username and password will appear on the console. Enter the credentials for the client account and press ENTER.
- check the log files in /var/log/ for debugging
On the client (Windows)
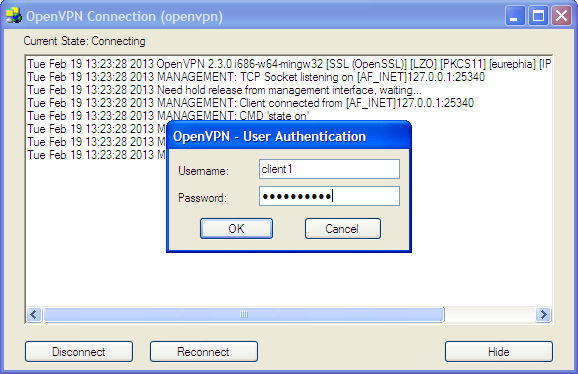
- From the Windows program files menu, start the OpenVPN GUI program. The openvpn icon will appear in the sytem tray. Right-click on the icon and select 'Connect' on the config for your vpn. A dialog box prompting for a username and password will appear.
Enter the credentials for the client account and click 'Ok'.
That's it! :-)

